
System Settings
The system settings pages let you configure the identity, network connectivity and basic security of your PrivateLAN appliance.
System overview
- System name — a friendly name for the appliance, used to identify it in two-factor authentication apps and as the project name on PDF reports
- Telemetry — controls whether PrivateLAN sends usage data to help improve the product:
- Enabled — sends events together with a unique instance identifier
- Anonymous — sends events without any identifying information; PrivateLAN does not link them to the licence. The appliance still proves with its key that an event comes from a real PrivateLAN appliance (see the privacy statement)
- Disabled — never sends telemetry
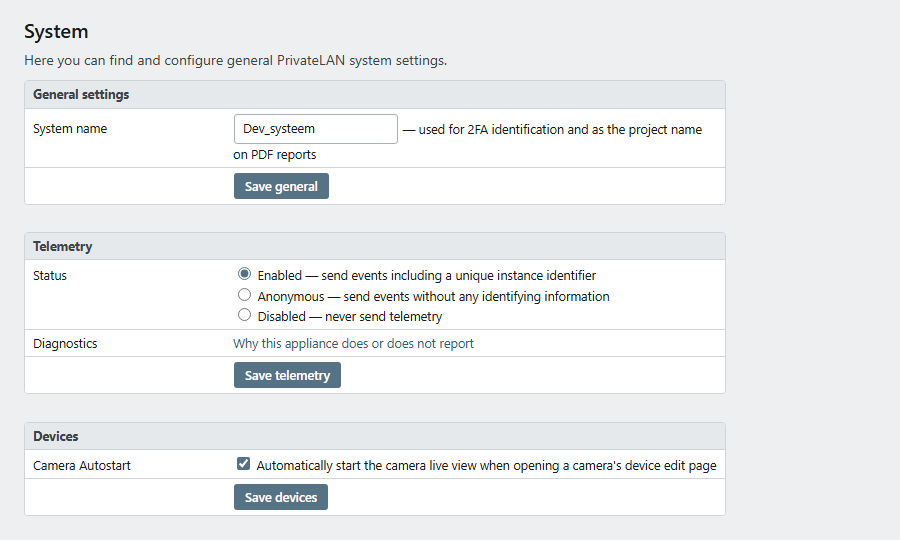
Telemetry is only sent by an appliance whose licence is linked to its update key. Since 26.10.4, Disabled also covers the reports the appliance sends on its own: the progress and outcome of an update, automatic repair of failed services and the automatic blocking of remote login. The updates themselves keep working; only the reports about them stop.
Diagnostics, next to the setting, opens a page that shows why the appliance does or does not report (the setting, the licence link, the reporting minute), with a button that sends the system health report now.
An error report names the file and line where the error occurred. Before it is sent, the appliance masks IP, MAC and e-mail addresses, account names and entered values in it, and the referring page goes without your appliance's name or address and without the values in the address bar.
Which connections the appliance makes to PrivateLAN, and which of them the Telemetry setting controls, is described in Outbound Connections.
Network settings
| Field | Description |
|---|---|
| Hostname | Fixed at app.privatelan.nl and cannot be changed. Under Required DNS settings the page lists the names your DNS server or hosts files must point at the Eth0 address |
| Timeserver | The NTP server this appliance takes its time from, by name or IP address. The appliance passes that time on to the switches in the local network (an NTP relay, only on Eth0 and only to private addresses, with a limit on how often one address may ask): give a switch the Eth0 address as its time server, so it needs neither internet nor DNS |
| Timezone | The timezone used throughout the system (default Europe/Amsterdam) |
| Eth0 (LAN) | IP address, subnet mask, gateway and DNS servers for the management/LAN interface |
| Eth1 (WAN) | DHCP or static IP configuration for outbound/internet connectivity |
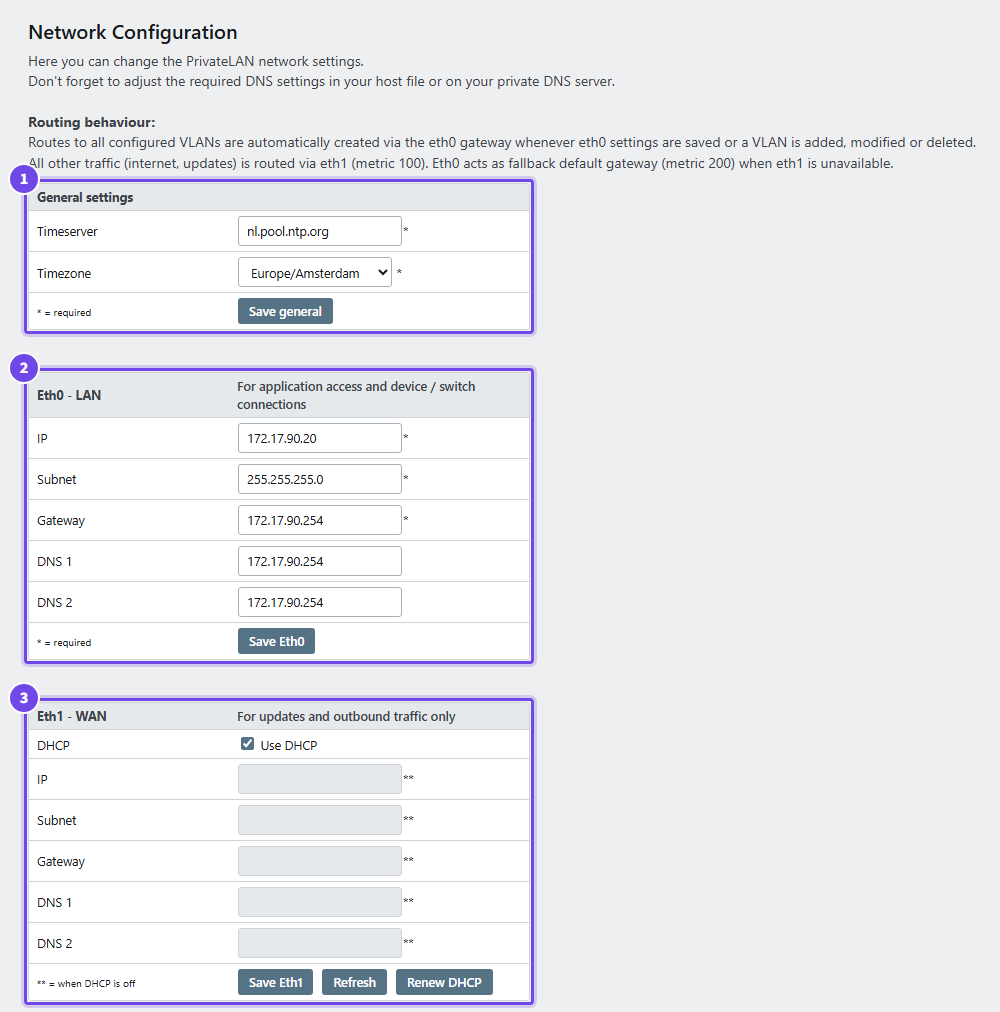
- General settings — time server and time zone
- Eth0 - LAN — the address for the web interface and the switches
- Eth1 - WAN — for updates and outbound traffic only
Changes to network settings are applied immediately — make sure the new settings are correct before saving, especially if you are connected through the interface being changed.
When Eth1 runs on DHCP, two extra buttons are shown:
- Refresh — re-reads the address the interface currently holds and shows it on screen. It does not contact the DHCP server.
- Renew DHCP — releases the current lease and requests a new one. Use this when the WAN side has changed (for example a different VLAN or subnet on the uplink), because the appliance otherwise keeps using its previous address until the lease expires. The renew takes a few seconds; outbound traffic is briefly unavailable while the new lease is requested.
Security settings
The security page shows the status of the appliance's internal firewall. Administrators with the appropriate permissions can enable or disable SSH access through the firewall.
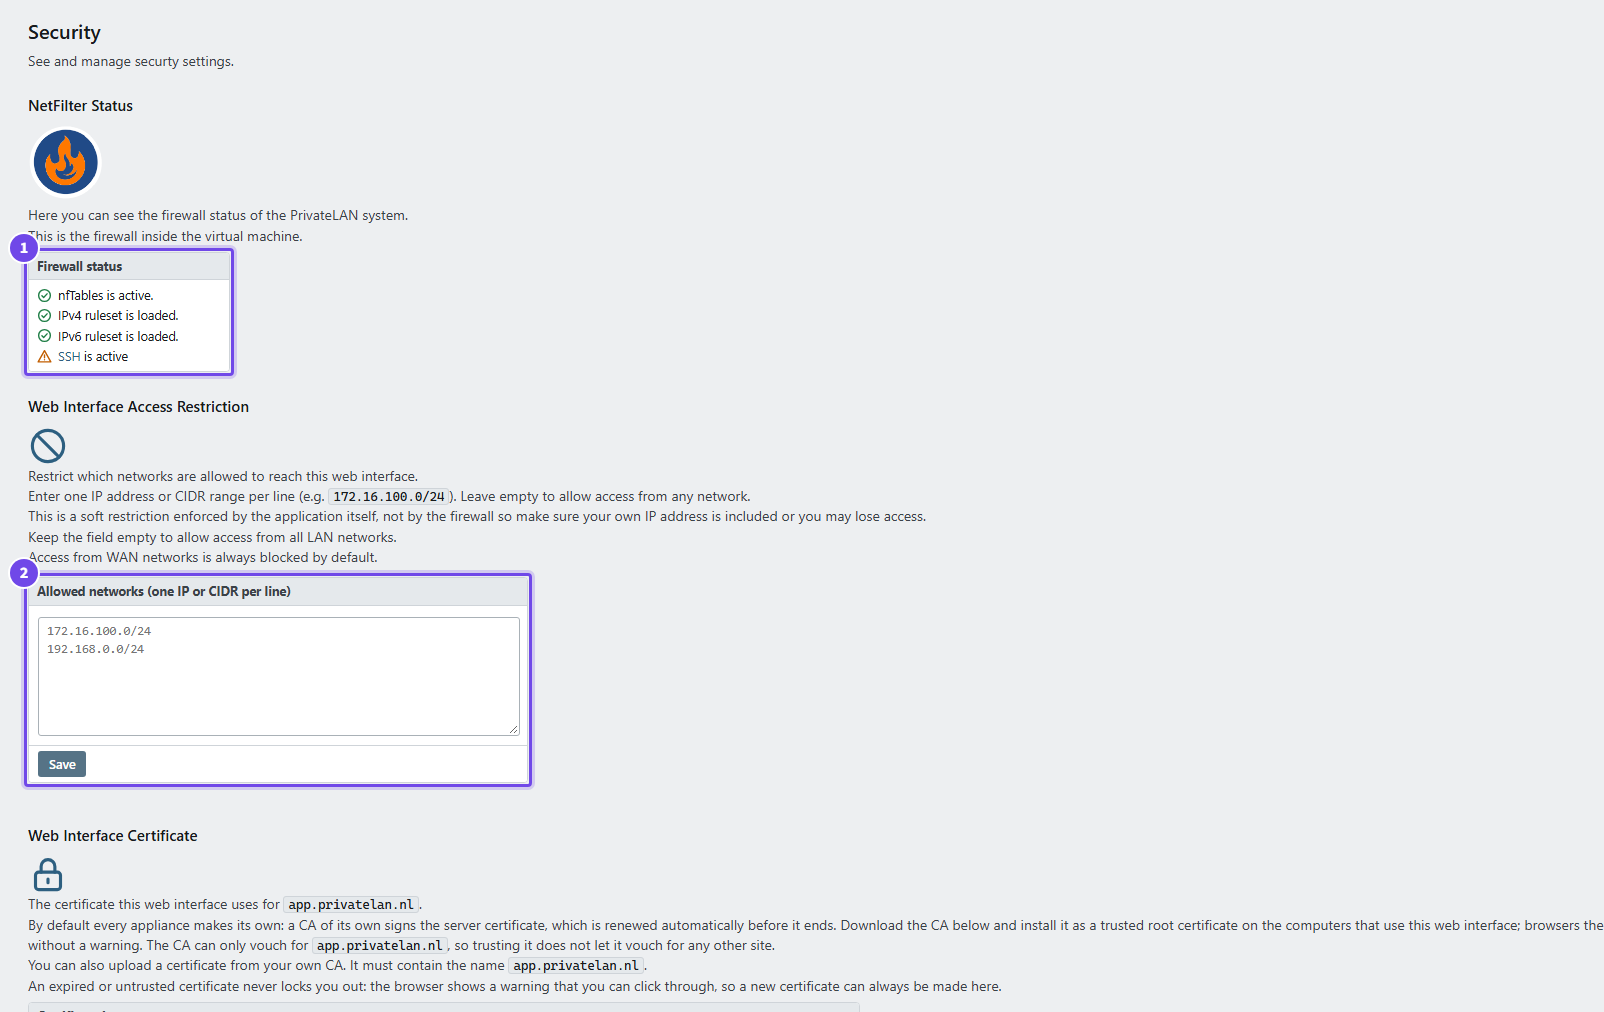
- Firewall status — the firewall inside the appliance, and whether SSH is open
- Allowed networks — the networks that may reach the web interface
SSH access is off by default. The appliance keeps the last setting across a restart, so a restart neither opens nor closes SSH. Opening SSH is meant to be temporary: the appliance closes it again at the end of every update and during the nightly check. Sessions that are already open stay connected.
Web interface access restriction (IP/subnet)
Administrators with the Manage web interface IP restriction role see an extra panel on the security page that lets them restrict access to the web interface itself to specific networks. Enter one IP address or subnet (CIDR notation) per line, e.g. 172.16.100.0/24. Visitors from any other network then see a clear error message instead of the login page.
- Leave the field empty to disable the restriction — this is the default, meaning the web interface is reachable from any network.
- This restriction works at the application level (a "soft block" inside PrivateLAN itself), not as a firewall rule — the appliance's own internal background tasks keep working regardless of this setting.
- Make sure the IP address you are connecting from is included in the list before saving, or you may lose access to the web interface yourself.
- This role is separate from the general role required to view the security page, so this sensitive setting can be assigned to specific administrators only (see User Management).
Web interface certificate
The web interface uses a certificate for app.privatelan.nl that the appliance makes itself: a CA of its own signs the server certificate. Nothing is fetched from the internet for this, so it works offline as well. The security page shows the certificate in use (who issued it, its names, how long it is valid and its SHA-256 fingerprint) and the appliance's CA.
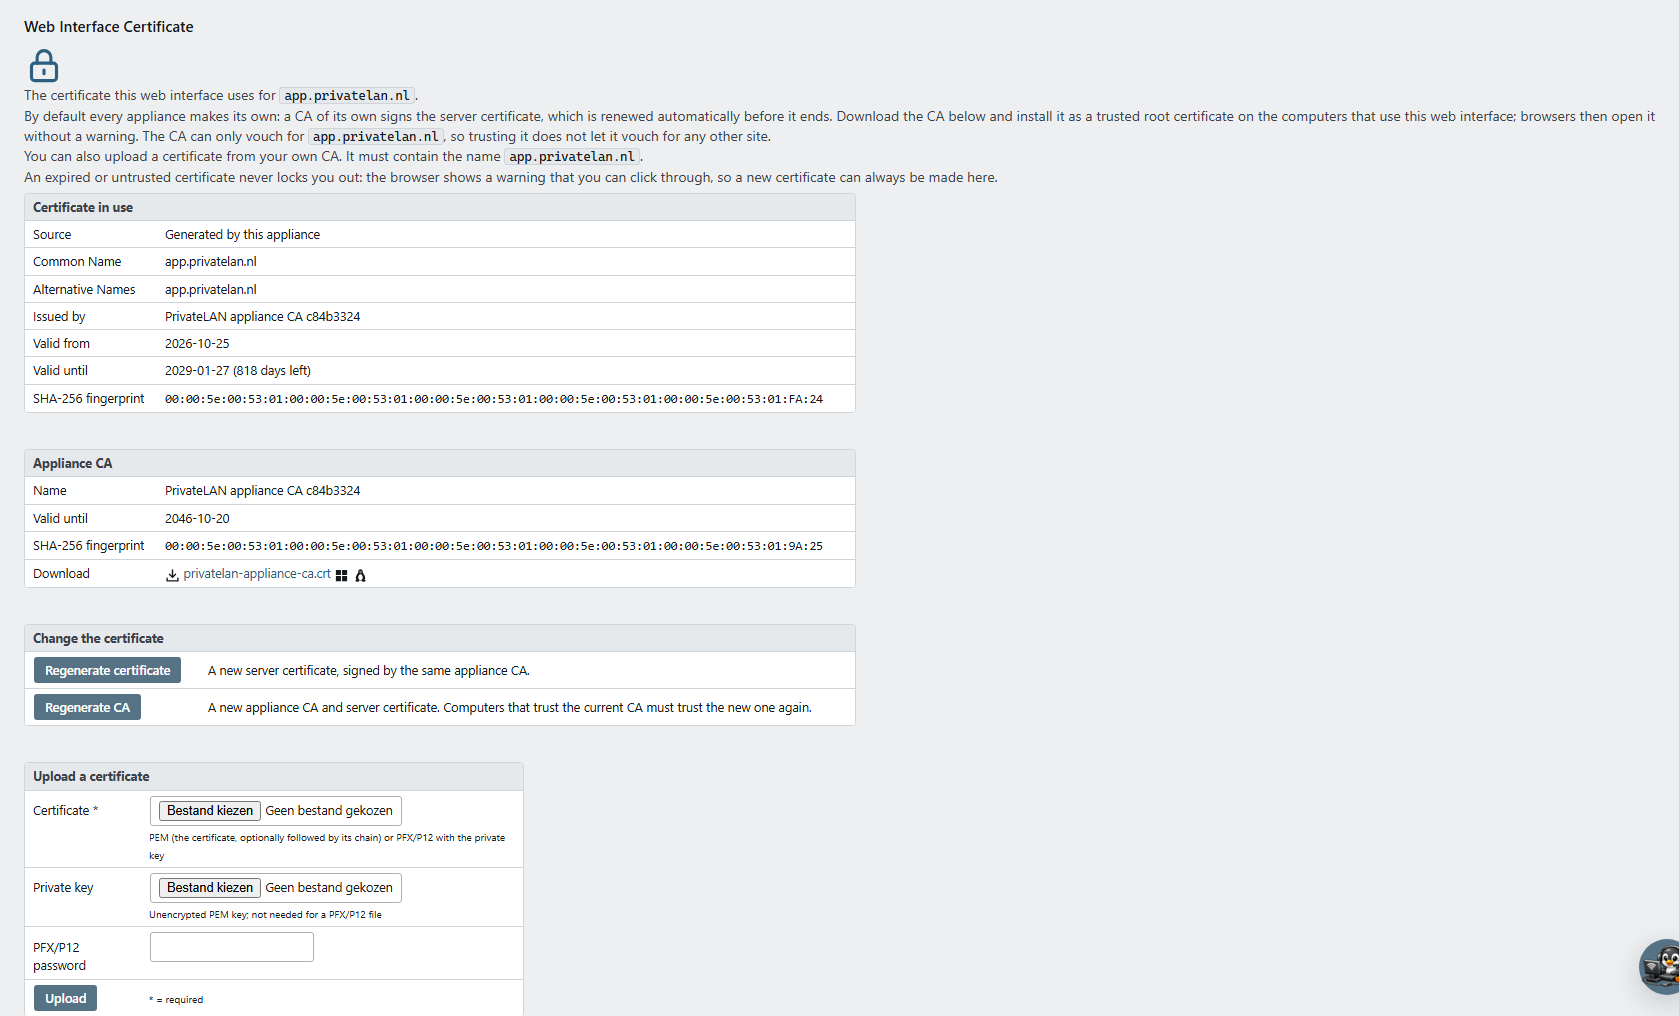
- Trust the appliance CA. Download
privatelan-appliance-ca.crtfrom the security page and install it as a trusted root certificate on the computers that use the web interface. On Windows: open the file, choose Install Certificate, Local Machine, and the store Trusted Root Certification Authorities, or distribute it with a group policy. Firefox keeps its own list: import the file under its certificate settings, as an authority for websites. Browsers then open the web interface without a warning. The CA can only vouch forapp.privatelan.nl, so trusting it does not let it vouch for any other site. - Renewal. The server certificate is valid for 825 days and is renewed automatically 30 days before it ends, by the same CA, so computers that trust the CA notice nothing. The CA itself is valid for 20 years. 825 days is the longest period Apple devices accept, also for a certificate you trust yourself.
- Each appliance has its own. No two appliances share a certificate or a CA: an appliance installed from the image makes a new one when it first starts, and again when the default administrator password is changed. Your browser then shows the certificate warning once more.
- Upload your own certificate. Administrators with the role Can regenerate or upload the certificate of the web interface can upload a certificate from your own CA instead: a PEM file with the certificate (optionally followed by its chain) and an unencrypted PEM private key, or a PFX/P12 file with its password. The certificate must contain the name
app.privatelan.nl(or*.privatelan.nl), must be meant for a web server and must not have expired; the key must be RSA of at least 2048 bits, or EC P-256 or P-384. An uploaded certificate is not renewed automatically: upload a new one before it ends. - Regenerate certificate makes a new server certificate with the same CA. Regenerate CA makes a new CA as well; computers that trusted the old CA must then trust the new one. While an uploaded certificate is in use, Use generated certificate switches back to the appliance's own.
- Never locked out. The web interface stays reachable with an expired or untrusted certificate: the browser shows a warning that you can click through, so you can always make a new certificate here. A certificate the web server refuses is not installed, and the previous one stays in use. After a change, reload the page; your browser may warn once for the new certificate.
API rate limits
Administrators with the Manage API rate limits role see a panel on the security page that sets how many API requests a single API key may make per minute. This protects the appliance and the switches behind it from a runaway integration; it is separate from the lockout that already applies to failed sign-in attempts, which keeps working regardless of this setting.
- General limit (100 by default) applies to every API endpoint.
- Switch-touching endpoints (10 by default) is a second, much smaller budget for the requests that open an SSH session to a switch or queue a job that does: device and switch actions, live device and switch status, service port activation, issuing or revoking a certificate, and starting a system update. Those requests count against both budgets, since a switch can only hold a few sessions at once.
- Requests that only read information the appliance has already collected — listing devices, the status overview for many devices at once, a switch's port list — count against the general limit only, so ordinary monitoring is unaffected.
- Set a limit to
0to switch it off. The switch-touching limit cannot be set higher than the general limit, because those requests always spend from both. - A key that goes over a limit is refused with a clear answer stating how many seconds to wait. See the REST API documentation for the exact response and headers.
- This role is separate from the general role required to view the security page, so this setting can be assigned to specific administrators only (see User Management).
Devices settings
For administrators with the Edit camera role, the System page also has a Devices panel with a Camera Autostart option. This controls whether a device's live camera feed (see Camera Live View) starts automatically when you open that device's edit page, or only once you press Start stream yourself. It is enabled by default.
Appearance and branding
- Light, dark or automatic — the web interface has a light and a dark appearance. By default it follows the setting of your operating system. The Light, Dark and Auto buttons at the bottom of the menu override that for the browser you are using; the choice is not shared with other users or browsers. The Tux assistant follows the same choice.
- Reseller branding — an appliance supplied through a reseller can show that reseller's logo and colours, in the web interface and on the PDF reports. The appearance is part of the license, so nothing has to be configured on the appliance. A license without a reseller brand shows the PrivateLAN appearance, also after the license expires.
AI settings
Administrators with the Manage AI assistant settings role see a System / AI page that controls the Tux assistant for the whole system. This role is separate from the general roles used elsewhere on the System page, so it can be assigned to specific administrators only (see User Management).
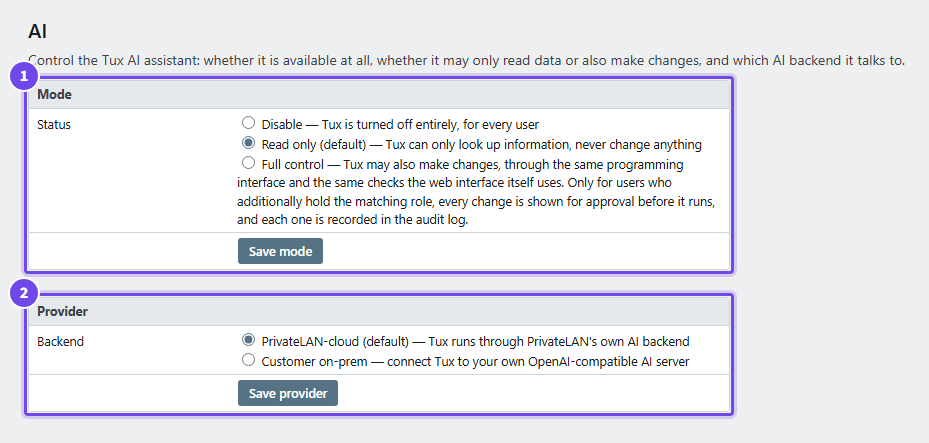
- Mode — Disable, Read only or Full control
- Provider — PrivateLAN-cloud or your own on-prem AI server
- Mode — Disable turns the assistant off entirely, for every user, regardless of any individual permission. Read only (the default) lets the assistant look up information but never change anything. Full control additionally allows the assistant to make changes — but only for a given user if that user is also separately granted the matching permission, and only after you approve each change in the conversation. This mode acts as a ceiling: it can only take permissions away, never grant them on its own. See Tux, the AI assistant for what Full control does and does not allow.
- Backend — choose between the PrivateLAN-hosted assistant (the default) or a customer on-prem AI server that you run yourself. When on-prem is selected, you provide a server URL and API key for your own OpenAI-compatible AI server (such as a locally hosted model), and may optionally add extra instructions in a system prompt field, which are appended to the assistant's standard instructions. The API key is stored encrypted and is never displayed again once saved.
- Response timeout (on-prem only) — how long the appliance waits for your AI server to answer, between 10 and 600 seconds, 120 by default. A model running on your own hardware can need considerably longer than a cloud service, particularly on the first question after it has been loaded into memory. Note that Full control requires a model that supports tool calling; a model without it can answer questions but cannot carry anything out.
